
Installing a Jexis on cavity sliding doors is simple, quick and easy.
The average installation time is less than two minutes and the only tool needed is a drill, two bits and a couple of screws. No routing, no chiseling, no mess, no fuss. The mechanism is spring loaded and fitted to the back edge of the door by drilling a clearance hole into the door and fastened by two screws through the faceplate. This will allow the plunger shaft to eject out of the door and strike the aluminium back stay of the cavity slider pocket propelling the door outward by approximately 300mm. Alternatively, the Jexis can be mounted through the aluminium backstay allowing the plunger shaft to strike the back edge of the door propelling it forward.


Pre-Hanger Fitting Instructions
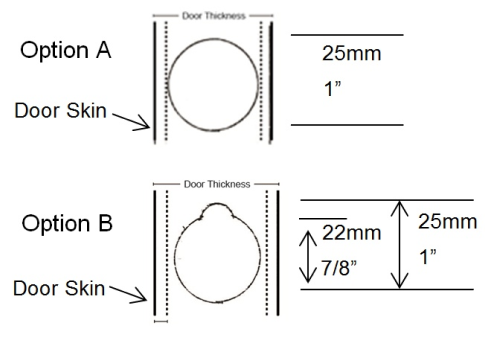
- With the back edge of the door facing you, measure and find height & centre eg: all doors = 1200mm up from bottom of door then find centre of door. A 38mm thick door = 19mm. Mark the door using a 25mm speed bore bit drill a hole to the depth of 100mm.
- As per option drawing A.
- On particularly narrow doors with minimal clearances, an alternative option would be to drill a 22mm hole and use a round rasp to cut some extra clearance. As per option drawing B.
- Place Jexis Cavity Release in the drilled hole and secure with 2 x screws. Now your door is ready to be fitted.
Handy Hints
- Allow a clearance of 12mm or half an inch between the back edge of the door and the back stay (vertical component) of the cavity pocket.
- If the door is slightly undersized in relation to the pocket. Place enough washers (packers) between the Jexis face plate and the back edge of the door until the front edge of the door is flush with the opening Jambs.
- Alternatives if door is too wide buzz to required width.
Do Not
- Check face plate into doors edge as this may impede the loading and release cycle of the Jexis plunger.
- Adjust body screw, this is a guide screw only preset in the manufacturing process.
Builders Cavity Fitting Instructions (Installer)
- N.B. Back stay of Cavity opposite the Jexis in door to have no screw fixings. Screw backstay to framing away from the release mechanism area.
- Cavity back stud and back edge of door must be plumb allowing the gap between door and back stud to be parallel and clear of any foreign objects. Failure to do this could affect the smooth and positive feel of the Jexis action.
Handy Hints
- There must be no excessive high spots between the back edge of the door and aluminum backstay that might impede the loading and release cycle of the Jexis plunger. (A recommended option is to fix the backstay by screwing through the nog channels of the aluminum backstay clear of the back edge of the door.)
- These instructions refer to an assembled cavity slider all made up ready to fit in the trimmed hole. The aluminum backstay referred to is the back vertical component that forms part of the structural cavity frame.
- If the cavity slider is to be built in position allow a clearance of 12mm or half an inch between the back edge of the door and the stud or surface contact area for the Jexis plunger.
Do Not
- Check face plate into door edge as this may impede the loading and release cycle of the Jexis plunger.
- Adjust body screw, this is a guide screw only preset in the manufacturing process.
Transportation of Cavity Sliders fitted with the Jexis
On the backstay of the cavity pocket it is essential to put temporary packers between the back edge of the door and the inside of the backstay. This is to stop the door bouncing up and down on the Jexis during transport which would damage the internal mechanism.
Failure to follow the above conditions will void any warranty claim.
IMPORTANT
Before installation of the Cavity pocket, the temporary packer blocks must be removed as they would interfere with the operation of the Jexis.
